Saturday, May 30, 2015

Triangle Scalloped Shawl


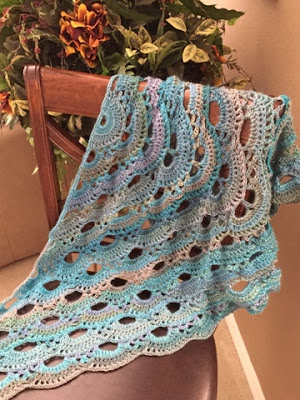
I made this easy and beautiful triangle shawl for my boyfriend's sister as a graduation present. I wanted to make her a small afghan, but I didn't have quite enough time for that so I decided to make this shawl instead. Once you understand the pattern, it works up really quickly. I only worked on it for a couple hours every day and it took me about 4 days to do. I also fell in love with the yarn I used. It took some effort to find the actual pattern. I went through Pinterest which led me to a blog post about the shawl, which then led me to a Ravelry post that linked to the original pattern which was not in English, but through that post, I found a link to a pdf pattern that had translated the pattern into English. Complicated, I know. So I am going to provide a link to the Ravelry post that includes the English translation, which you can find here


Hook: H (5.00mm)
Yarn: Red Heart Boutique Unforgettable in Tidal
Measurements: approx. 69 in. long, and 32 in. wide
       (Repeat pattern 11 times)
Finishing: This is the only part I did differently than the pattern. I simply did one row of single crochet along the longest side to give it a more finished look. 


Saturday, May 23, 2015

Chunky Basket


I currently work at a museum called the Public History Center in Sanford, FL. On most Saturdays, we have super fun workshops available for the public. Early this June, I will be teaching the 3rd crochet workshop we've had at the museum. During the 1st one, we made a simple crocheted circle scarf, the 2nd one we made granny square dishcloths, and at this one we are going to make cute summer baskets. I've been trying to come up with a pattern to use during the workshop, but I wasn't liking anything I came up with, so I went to Pinterest for ideas, of course. I found a great pattern through Ravelry.


I used this pattern almost exactly except for a few minor changes. First, I used Lion Brand Yarns Hometown USA in Detroit Blue, with a N hook. Also, I started with a magic circle, and I made the basket slightly smaller than in the pattern. I stopped at round 4 for the base, and continued with the rest of the pattern adjusting the number of stitches.

Overall, it was very easy to make and only took me about an hour. I will definitely make more of these one day and try out different sizes and yarns.

Monday, April 27, 2015

Stash Buster Blanket

Over the last couple years, I have accumulated a TON of yarn. Like seriously a lot. Anyways, I was running out of places to store all of my yarn so I decided it was time to use some up. This blanket turned out super colorful and I absolutely love it.

I found a great example on Pinterest of a "stash buster blanket" (which you can find here) and decided to go for it. It's super simple - just rows and rows of V stitches, and then I added two rows of single crochets for the border. The short pattern I added here is not very specific, but that is because you can make this blanket however you want! Make it as small or as big as you want it, using any kind of yarn that you have lying around.

I used a wide variety of yarn, but mostly Caron Simply Soft.

H (5.00 mm) hook
Chain desired width of blanket
Complete V-stitches all the way across, switching colors with every row.
Continue until you reach the desired length
For the border, complete two rounds of single crochet.
Finish off, and you're done! 


Saturday, April 18, 2015

Small and Blue: Quick and Easy Basket


For this basket, I worked with two strands of worsted weight cotton yarn.
Hook: J (6.00mm)

Start with a magic circle.
Rnd 1: 8 hdc. Join with sl st.
Rnd 2: Ch 2. (Ch 2 counts as first hdc here and throughout.) 2 hdc in each st. Join with sl st. (16 hdc)
Rnd 3: Ch 2. Hdc in same st. *hdc in next st, 2 hdc in next st*; repeat from * Join with sl st. (24 hdc)
Rnd 4: Ch 2. Hdc in same st. *hdc in next 2 sts. 2 hdc in next st*; repeat from * Join with sl st. (32 hdc)
Rnd 5: Ch 1, turn. In back loops only, sc around. Join with sl st. (32 sc)
Rnd 6: Ch 2. Going through both loops, hdc around. Join with sl st. (32 hdc)
Rnd 7: Ch 3. Dc around. Join with sl st. (32 dc)
Rnd 8: Ch 1. In back loops only, sc around. Join with sl st. (32 sc)
Rnd 9: Ch 2. Going through both loops, hdc around. Join with sl st. (32 hdc)
Rnd 10: Ch 1. Sc in next 5 sts. Ch 7. Skip 6 sts. Sc in next 10 sts. Ch 7. Skip 6 sts. Sc in next 5 sts. Join with sl st. (20 sc and 2 ch 7 spaces)
Rnd 11: Ch 1. Sc around, with 8 sc in each ch sp. Join with a sl st. (36 sc)
Finish off and weave in ends.


Monday, April 13, 2015

Turtle Turtle


My sister is obsessed with turtles. Absolutely loves them. 
So when I found these adorable little crocheted turtles, I had to make one for her. 
I just thought it turned out so cute that I had to share, so here it is! 

You can find the pattern here

Giant Granny Square Blanket

Yarn: Worsted Weight
Hook: I (5.50mm) 

Individual Squares: 12in x 12in

This blanket was my first attempt at a granny square blanket. (Well, first completed attempt.)
I used a magic circle to start all of my granny squares. Using a traditional granny stitch, make a square with 9 rounds (or however many is required to make a 12in x 12in square). You will need 5 squares in each color for this size blanket. 
I joined the squares using a granny stitch (You can find a great tutorial on how to do it here) and then did a large border around the whole thing. The border came from a book by Jean Leinhauser that can be found on Ravelry